HOW TO PAINT THE BEAUTY OF AUBURN HAIR IN WATERCOLOR OR ANY MEDIUM
FREE ART LESSON 2

WORK IN PROGRESS
by Susan Harrison-Tustain
www.susanart.com
Welcome to a free How to Paint auburn hair session!
You will be able to view this lesson more effectively in this blog as FB doesn’t allow images to be interspersed within text. Here I am able to highlight the points I wish to make throughout the lesson which emphasises the point I am making in each hint and tip.
I have now also placed LESSON 1 below this post to give quicker, easier reference and access for you.
In LESSON 1 you will have seen how I begin most of my paintings with varying strengths of pale yellow under-washes/glazes. You may recall I also mentioned that many paintings that have white highlights. If this is the case – I ensure the white areas remain white – with no yellow underwash in those areas.
The first lesson showed one side of Sarah’s hair with the yellow underwash and the other side auburn hair as it was starting to take shape.
This image allowed you to see the first step and also where I am headed.
In this Lesson we will go back to our yellow underwash on both sides of the head – add strength to areas of yellow underwash that need more saturation – and then I will discuss how I create the first of the auburn washes.
SO LET’S GET STARTED ON THE SECOND STAGE OF THE YELLOW UNDERWASH FIRST:
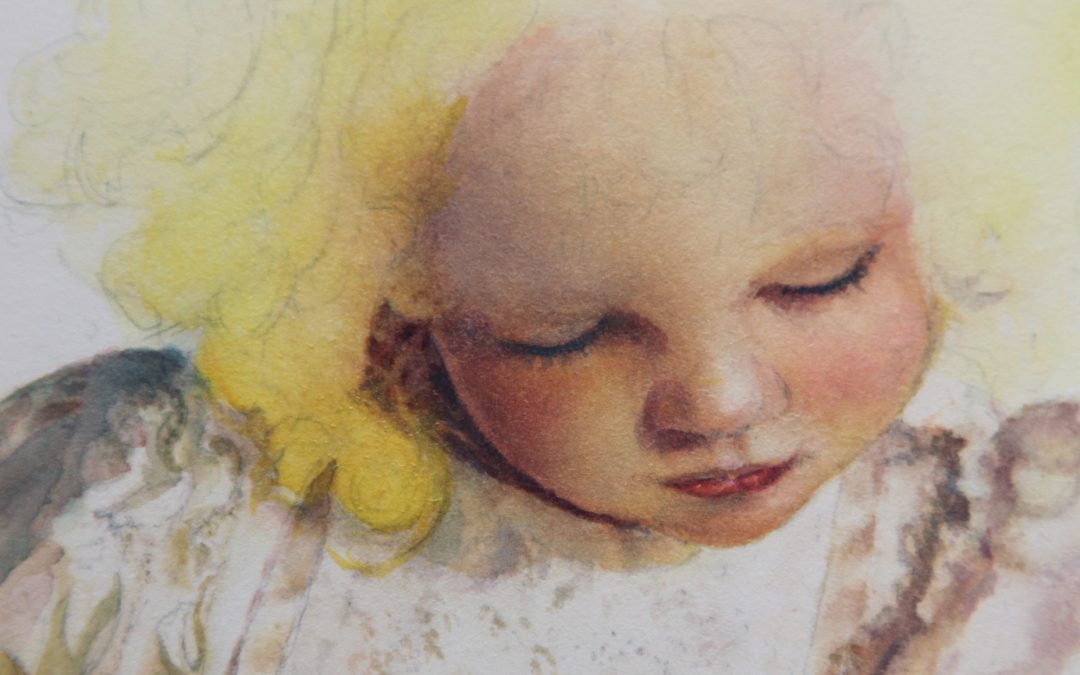
In the close up image below – you can see I have begun strengthening the yellow in the front left hand side. I did this by laying in a second underwash of yellow where I want the hair to be warmer, more rich and more glowing.

Once the painted areas are dry, I lay in a variety of color auburn color mixes to describe Sarah’s auburn hair. I use varying combinations of these colors to create those mixes. It is fun to become familiar with all the possible mixes you can create with these few colors. Simply push your mixes to favour one color and then another. You will be amazed!
Colors used to create an auburn hair color:
Aureolin Yellow Modern, Translucent Orange, Ultramarine Blue Finest, Quinacridone Red. The different combinations are easily achieved by allowing different colors to dominate the mix.
Local Color:
A beautiful, transparent (non sedimentary) Burnt Sienna can be mixed using these colors above. Play with the colors – you will see what I mean. This ‘Burnt Sienna’ color is ideal for the ‘Local Color’ areas of the hair.
Shadows:
Shadows need to be dark and warm.
These are easy to create if you use the colors mentioned above – but allow the blue and red to dominate the mix. Your shadow color will be harmonious because you are using the same palette of colors but pushing your mix into the ‘shadow’ range by using the stronger darker colors.
Highlights:
As mentioned previously – the highlights in this study are very pale yellow
Before I lay in my Auburn colors, I spend some time observing Sarah’s hair. Where the shadows are, how the ribbons and strands of hair flow in and out of the light etc. Good observation is key to the success of creating beautiful, life-like hair. I take note of the following points – often making an assessment of what is in front of me. This helps me to understand how light and shadow will help me to describe the undulating flow of Sarah’s beautiful waves :
POINTS TO CONSIDER::
– Light areas always appear to come forward in a painting. Therefore I retain the highlights at the front of a curl. (Retain means I leave these areas unpainted). I am sure to keep the edges SOFT AND BLENDED where the local color meets the highlight. I do this by laying in a damp wash over the local area and highlight too. Once the wash is just damp – not wet or shiny – I lay in a wash of my local color into this slightly damp clear water wash. If you judge it right – you will find the flow of pigment into the highlighted area is very minimal. Your pigment will have very little flow.due to the minimal amount of water on your paper. This minimal flow will allow a gentle blend with the highlight.area where the two meet.
I have digressed a little! We were discussing how light areas – especially whites – appear to come forward in a painting.
– Conversely I use shadow areas in the depths of the curls. Shadows are darker. Dark colors recede into the composition.
– The rest of the curl is ‘local color’. ‘Local color’ refers to the color of the object – without light or shadow affecting it.
HOW TO START DESCRIBING THE WAVES AND CURLS WITH COLOR:

Initial Auburn Color Wash. Notice how I have varied the colours to describe the curls, highlights and shadows
On my mixing palette I create the color mixes that I am likely to need to allow me immediate access to a variety of auburn colors and shadow colors.
I lay in a clear water wash over the highlights, local color areas and shadow areas.
TIP: I am often asked if the local color needs to go onto the shadow areas too. The answer is a resounding “yes”. I always paint my local color in the areas that will eventually also have my shadow colors on top. Why? Because in nature, shadows are on top of a local color.
Imagine hair that is not affected by light or shadow. What would we have – what would we see? If the shadow and highlights were not affecting our hair (or any subject for that matter) – we would see the local color of the subject wouldn’t we! There would be no light or highlight – and no cast shadows. They only thing left is the local color!
Establishing that local color underneath our subject will give the impression of our subject having more ‘substance’ – AND we are avoiding any harsh transition lines between local color and shadow color.
This tip is universal – it applies to any subject matter. :0). I digress again…….
While the wash is only just–slightly damp (the paper will have a matt surface – no sheen from the clear water wash) I can then drop in my local color where needed – including the in the areas that will eventually be in shadow.
Once dry I rewet the paper. When just slightly-damp again – I lay in my shadow color in the shadow areas.
The slightly-damp paper will allow the shadow color to blend into the local color area without leaving a hard demarcation line – as mentioned previously.
Watch this space for the next lesson……
While you are here – feel free to take a look around my website. You will find numerous other free lessons, hints, tips, materials, workshops, DVDs and video downloads that will help you on your painting journey
Happy painting!
Susan
www.susanart.com
Instructional Art DVD’s and Video Downloads
Click on any of the DVD images below to find more in-depth information on the contents of each of the DVDs and Video Downloads.
-
DVD: Watercolor Masterclass Volume One: “Painting Life-Like Leaves and Vibrant Greens” – for all skill levels
US$54.50 -

One-on-One Watercolor Workshops with Susan Harrison-Tustain – for all skill levels
US$54.50 -

Painting Watercolor My Way with Susan Harrison-Tustain – for all skill levels
US$54.50 -

Watercolor Portrait Workshop with Susan Harrison-Tustain – for all skill levels
US$54.50
