
THE IMPACT OF RED IN YOUR PAINTINGS Part 1
HOW TO PAINT ROSES AND OTHER SUBJECTS USING GLOWING REDS:

Image Caption: Rose ‘Josephine Bruce’ by Susan Harrison-Tustain. Watercolor on Arches 140lbs Hot Pressed paper.
In my thirty years of teaching international workshops,creating teaching Video downloads and DVDs, writing books and writing articles for international art magazines – this is the most asked question: HOW TO PAINT ROSES AND OTHER SUBJECTS USING GLOWING REDS..
The Power of Red in a painting is often under-rated.
I hope to open your eyes to the impact of mixing and using the right reds in the right places within your painting composition.
Follow my hints and tips below as they will reveal how they can help you to paint roses and numerous other subjects using beautiful clean, luminous red mixes that glow with life and dance on your paper/canvas!
This is a two-part series where I will share some of the breakthroughs that revolutionized my understanding and subsequent ability to create luscious reds!
In Part One you will find:
In this initial SusanArtStudios Blog Post, I will focus on how I make my reds glow luminously.
We will not only discuss the colors I use – but we will also discuss my secret behind the glow of my reds!

Image Caption: ‘No More His Song’ by Susan Harrison-Tustain. Oil Painting on Belgian Linen.
In Part Two you will find:
In my subsequent SusanArtStudios Blog Post (coming soon) I will give you many examples of how a strategically placed red can be the master-stroke in a painting composition.
Now let’s get started on PART ONE!
Time to have some fun!
THE QUESTION SO OFTEN ASKED IS:
HOW DO I CREATE MY LUSCIOUS REDS?
Observation!!!
As always I teach my artists to begin with great observation.
This will help you become familiar with your red subject.
ASK YOURSELF SOME CRUCIAL QUESTIONS THAT WILL HELP YOU TO SEE THE ANSWERS WITHIN THE SUBJECTS
- Firstly look at what the surfaces of the subjects are telling you about the color, texture and form of the subject
- Ask yourself:
- Is it a warm glowing light red?
- Is it a rich dark velvety red?
- What are the highlights telling you?
- Are they sharp-edged?
- Are they soft-edged velvety highlights?
- Are their any colors in the highlights? Maybe the highlights are darker than you would imagine as seen in the blue highlights on the velvet texture of the rose below.

Image Caption: Cropped detail of ‘Josephine Bruce’ Watercolor painting with luscious deep velvety reds.
Become involved in how the surface flows
- Is it flat or is it curved?
- How do you know?
- Decipher what tells you whether the petal curves or is flat
- You will notice a curved object has subtle changes as it presents itself out of the shadow and into the light.
- You will see subtle to moderate changes in
- color (hue).These changes are often soft blended colors that seamlessly flare into slightly different hues
- warmth or coolness of color (color temperature),
- light and darkness (tonal value)
- Saturation of color (intensity).
- light and darkness (tonal value)
- warmth or coolness of color (color temperature),
- color (hue).These changes are often soft blended colors that seamlessly flare into slightly different hues
You will find the answers to the questions above by observing your subject and analysing what you are seeing in terms of color, warm colors and cool colors, light and shadow and saturation of color.
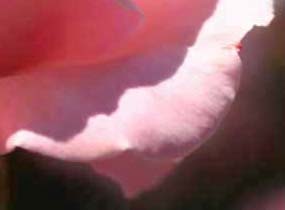
Image Caption: Can you see the seamless and subtle changes in color, color temperature, as well as color saturation? Less subtle is the contrast in light and shadow. All of these allow the petal to have a three dimensional form. Does the petal appear to be presenting itself from deep inside the central area and reaching forward towards you? THIS is what you look for.
Compare that to a flat surface of color where the color is uniform. You will find it looks flat because there are very few changes on a flat colored surface.
All these things you learn by observation and simple analysis will be wonderful ‘tools’ in your paint box that will influence the color mixes you choose to describe the surfaces of your subject.
What else do we need to observe in our red painting subjects?:
- Look closely at the red object
- Look most closely at the highlights and shadows- compare them – what differences do you see?
- Bright glossy highlights tell us the surface is shiny.
- Dull soft blurred edged highlights tell us that the highlight is likely to be on a velvety, suede, soft fur etc type of surface.
- The EDGES of the highlights will tell you what you are looking at. Compare the images I have selected to show you how your highlights will help you to describe the surface you wish to paint.
- Are the shadows dull or are they also rich and vibrant?
- Is it a tomato red color or a rich deep luscious red?
- Is the surface/texture of the subject smooth,rough, velvety, shiny, matt?
- Is the surface flat or curved? We describe our flat surfaces very differently from our curved surfaces.
- Find an example of a flat surface in nature.
- Find an example of a curved surface in nature.
- Take the time to determine what I have done to describe a flat surface compared with a curved surface.
- Comparing what we see is the very best way to learn and understand what is in front of us.
- Understanding how highlights and shadows bring color changes to the surface, helps us to decipher what we are seeing before us. This observation allows us to read nature’s color-mix recipe for capturing those surfaces in paint.
VELVET ROSE = BLURRED SOFT-EDGED HIGHLIGHTS.

Image Caption: How to paint rich velvet red roses. The velvet texure is described by the soft edged highlights.
Detail: ‘Josephine Bruce’ watercolor by Susan Harrison-Tustain.

Image Caption: In the watercolor painting above is a mature, soft apple. How can you tell? I have used slightly soft-edged highlights. If the apple was fresher – the highlights would be sharper – indicating the apple is crisp and fresh.

Image Caption: Fresh ripe cherries with sharper-edged and brighter highlights – indicating the skin is tighter and fresher.
THAT BRINGS ME TO GLOWING RED COLOR MIXES
- In both my oil and watercolor paintings I am able to create luminous glowing reds because I use a yellow underwash in my first layer.
- Generally I use a cool transparent yellow such as Schmincke Aureolin Yellow Modern (watercolor) or the equivalent in transparent oil paint. You will be amazed at the difference an isolated underlayer of yellow makes to the finish, giving a true sense of presence to your subject.
- Be sure to let this underlayer become bone dry before adding subsequent color layers
If painting in watercolor – BE SURE TO RETAIN YOUR WHITE HIGHLIGHTS. They must remain light INITIALLY . You won’t want yellow on those of course!
- I reiterate- I prefer to keep my highlights white initially – and then fine- tune the highlights – if needed – in the fine-tuning stage at the end of the painting.
- My choice of red I use for my subsequent layers will depend on the color of red I am trying to achieve.
- For instance a tomato red object would require the use of a mid-red for instance. By “mid red” I am referring to a red that is not a very yellow red -or not a very dark red. Mid red is in between.
A rich deep Velvety red rose would require deeper darker reds. I would use the shadow color mix mentioned below – but I would be sure to allow my Daniel Smith Anthraquinoid Red to dominate my local color. I would adjust my shadows accordingly.
Tomato

Image Caption: Mid red tomato. The local color of this tomato is the red of the skin (without the influence of highlights or shadows)
Can you see how the ‘local color’ of this tomato is a mid-red? It is not a very yellow/red or a very dark/red. It sits in the middle of the red scale.W
LOCAL COLOR (this term refers to the color of the object – without light or shadow influencing the color). Imagine if we didn’t have light or shadow on this tomato. You would see the true ‘local color’ only. Just as a face has a local color too. It is the skin tone mix that is not influenced by light of shadow. Local color simply means the actual color of the object – without any influences.
HERE ARE THE COLOR MIXES I WOULD USE TO CREATE A HUGE VARIETY OF REDS. YOU CAN EASILY ADJUST THE RED BY ALLOWING YOUR MIX TO FAVOR ONE OR MORE OF THE COLORS USED TO CREATE THE MIX.
WATERCOLOR
Local Colors
You can create a basic local color from the mix of the colors below. Vary the amount of each color to give you a wide range of hues to help you describe the colors you see in your subject.
Great tips for mixing the right colors:
For instance – there will be times when you need a more ‘orange/red’ for a particular spot in your painting.
In that case you would use less scarlet red and add more yellow to your mix.
You may see an area in your subject where you need a stronger, darker red. In that case you may like to allow your mix to favor the Daniel Smith Anthraquinoid Red.
By varying the ‘dominant’ color in this way – your mixes of color – you will have created an array of harmonious color mixes.
I find the most efficient and effective way to mix a variety of harmonious colors – is to use my ‘color-trail tip’ which I have outlined lower down in this post. You will find your mixed colors will be ready at your finger-tips (brush tip!) when you need them. Rather than having to start from scratch each time you need a slightly different color from the one you have mixed.
My color trails allow my paintings to flow with ease rather than to stop -start mix, remix, begin again and again each time you need a new color.
Here is the basic color mix I would use to create the red velvet roses in the ‘Josephine Bruce’ painting.
FOR WATERCOLOR:
I would initially begin with an Aureolin Yellow Modern underwash. Allow to dry – I would then create color trails of a variety of the following color mixes:
Schmincke Scarlet Red with varying mixes of the following:
Schmincke Aureolin Yellow Modern
Small amount of Schmincke Translucent Orange
Daniel Smith Anthraquinoid Red
If your mix is too red – then simply add some more yellow or orange. If it is too orange – why not add some more Scarlet Red or Anthraquinoid Red.
Experiment! Have fun. You will be amazed at how much you will learn by push/pulling your color mix to create just the right colors!
Shadow Colors
When creating a naturalistic shadow color – I always begin with some of my LOCAL COLOR mix
Create a variety of color mixes from the colors above – simply adjusting your colors as you see fit.
A naturalistic shadow color can be created with a variety of colors starting with with the local color:
SHADOW COLOR RECIPE FOR THE REDS IN MY JOSEPHINE BRUCE PAINTING:
- Yellow underwash (Aureolin Yellow Modern) – Then a variety of mixes created with:
- Local color
- A very, very small amount of the complementary color (green)
- You may also like to add a touch of blue if needed. Juggle the colors until you get the color trail you need for your painting
HINT
I much prefer my shadow colors to be warm, rather than cool. Therefore I always ensure my shadow mixes favor more red than blue or green.
MY RULE OF THUMB SHADOW MIX RECIPE FOR ANY SHADOW COLOR
TAKE A DOLLOP OF LOCAL COLOR
ADD SOME OF THE COMPLEMENTARY COLOR OF THAT LOCAL COLOR
NOW ADD A CONSIDERED AMOUNT OF PHTHALO BLUE (VERY MINIMAL)
PUSH/PULL YOUR SHADOW COLOR TO CREATE A VARIETY OF NATURALISTIC SHADOW COLORS AS REQUIRED.
The more familiar you become with how easy it is to adjust your color mixes – the greater your repertoire and color mixing skills will be.
Now you know how to mix beautiful natural shadow colors!
You can see how I have used these simple color mixes to create all of the wonderful realistic and evocative reds in the watercolor painting of the beautiful rose ‘Josephine Bruce’ – illustrated in the images earlier in this post.
OIL PAINTING
Most artist quality oil paint brands are good
Do check the labels of your paint tubes to help you determine if a color is transparent, semi transparent, semi opaque or opaque. I LIKE TO USE MOSTLY TRANSPARENT COLORS FOR MY GLAZES AND SHADOW COLORS.
Local Colors
Aureolin yellow or any cool yellow (be sure not to choose a color that is too lemon – but also be sure it is transparent or semi transparent)
Cadmium red middle. This is an opaque color. If you are glazing you may like to use a more transparent red. such as Schmincke’s Norma Professional Poppy Red. This is a beautiful transparent red.
Alizarin Crimson replacement (Light fast)
push/pull these colors as I suggested with the watercolor mixes. Please refer to my ‘Watercolor’ notes directly above
Shadow Colors
As with my watercolor shadow colors – I always begin with some of the ‘local color’ as this is the basis for your naturalistic shadow color
Then create a variety of color mixes with the addition of:
Any lightfast Alizarin Crimson replacement such as Schmincke Norma Professional Madder Red. This is transparent and extremely light fast.
Touch of Phthalo Blue and/or a touch of Phthalo Green (use these sparingly). Green is of course the complementary color of red.
I USE THIS BASIC PRINCIPLE/RECIPE FOR ALL SHADOW MIXES NO MATTER THE COLOR.:
LOCAL COLOR
COMPLEMENTARY COLOR
TOUCH OF PHTHALO BLUE OR PHTHALO GREEN (I SOMETIMES USE SAP GREEN INSTEAD OF PHTHALO GREEN – IF I WANT A SOFTER INFLUENCE OF GREEN).
LEARN TO PUSH/PULL YOUR COLOR MIXES AS THIS WILL ALLOW YOU TO CREATE MANY BEAUTIFUL COLORS WHERE ONE OR OTHER PIGMENT IS DOMINANT – THEN ANOTHER – AND SO ON.
ALLOW YOUR MIX TO TO FAVOUR THE COLORS YOU SEE IN YOUR SUBJECT SHADOW COLORS.
FOR INSTANCE – IF YOUR REDS NEED TO BE AN ORANGE/RED IN A PARTICULAR AREA – SIMPLY ADD MORE YELLOW AND A TOUCH OF ORANGE IF NEEDED.

Caption: RICH DARK warm SHADOW RED ON TOP OF ORANGE RED
IF YOUR REDS NEED TO BE RICH DARK REDS – SIMPLY USE MORE Daniel Smith Anthraquinoid Red AND ADJUST THE PHTHALO BLUE AND PHTHALO GREEN IN YOUR MIXES.
YOU WILL FIND YOUR WINGS QUICKLY ONCE YOU HAVE HAD TIME TO EXPERIMENT WITH THE MIXES ABOVE.
THE BEST WAY TO LEARN IS TO DO IT.
EVERYTHING FEELS ABSTRACT UNTIL YOU ACTUALLY HAVE YOUR PAINT AND PALETTE BEFORE YOU AND BEGIN CREATING THE HUGE VARIETY OF MIXES THAT ARE POSSIBLE WITH A VERY LIMITED PALETTE SUCH AS THIS! TAKE CONTROL OF YOUR COLORS. THE POWER OF COLOR IS IN LEARNING TO MASTER MIXING. IT IS EASY AND SO MUCH FUN.
COLOR TRAILS.
These save so much time and deliver a huge variety of color mixes ready and waiting for when you need them!
I love to create color trails on my palette. I place a ‘blob’ of each color I need in the mixing area of on my palette. I link them by pulling the colors together. It has a rainbow effect as you can see in my image below.

Image Caption: WATERCOLOR COLOR TRAIL. YOU WILL SAVE AN ENORMOUS AMOUNT OF TIME IF, BEFORE YOU START PAINTING, YOU CREATE SIMPLE COLOR TRAILS OF THE COLORS YOU WILL BE USING . YOU WILL HAVE INSTANT ACCESS TO A HUGE NUMBER OF PREMIXED COLORS WITHIN YOUR COLOR TRAIL ALL READY AND WAITING AT YOUR FINGER TIPS! THIS IS TRUE OF OIL OR WATERCOLOR.
IT IS SIMPLE! YOU ARE IN CONTROL. UNDERSTAND THESE EASY TO GRASP PRINCIPLES AND YOU COULD BECOME A MASTER MIXER OF COLORS IN NO TIME AT ALL!
With just these few colors – you can create the most luscious reds that glow with life, reality and sumptuousness!

Image Caption: ‘Inner Sanctum’ by Susan Harrison-Tustain.
Watercolor on Arches 140lb (300gsm) Hot Pressed paper.
Reds with the first stages of warm shadow colors

Image Caption: YOU CAN SEE HOW I HAVE USED CLEAN, TRANSPARENT, RICH, WARM REDS TO DESCRIBE MY LOCAL COLORS AND MY SHADOW COLORS. THEY DANCE WITH LIFE ON MY PAPER. ALSO NOTE THE HIGHLIGHTS. JUST A FEW STRATEGICALLY PLACED HIGHLIGHTS TELL THE STORY OF THE STRUCTURE OF THE PETALS: SLIGHTLY SOFT EDGED WHICH INDICATES A SLIGHTLY SHINY PETAL WITH SOFT PETALS. COMPARE THOSE WITH THE ANTHER – YOU CAN TELL IT HAS A MATT SURFACE. THERE IS NO REFLECTED LIGHT CREATING HIGHLIGHTS ON THE ANTHER. WHEN WE THINK ABOUT SUCH THINGS – WE ARE AWARE OF THEM. PRIOR TO ‘KNOWING’ – WE JUST FEEL THEM! ARTISTS NEED TO KNOW AND FEEL THEM!
Can you see the gradual seamless changes of color, color temperature, light, shadow – plus saturation have allowed me to create a true three dimensional form from a flat piece of paper?
IF YOU BLOCK OUT THE HIGHLIGHTS WITH YOUR FINGERS – YOU WILL OBSERVE HOW THE TULIP LOOKS SO MUCH FLATTER.
DO TRY IT. YOU WILL BE AMAZED!
THIS TULIP PAINTING IS A WATERCOLOR. I USE THE SAME PRINCIPLES NO MATTER WHAT MEDIUM I USE – OTHER THAN I USE WHITE PAINT FOR MY HIGHLIGHTS IN ALL MEDIUMS EXCEPT WATERCOLOR.
My shadows are warm shadows.
My highlights are cool white paper.
The contrasts give me the impression of form.
COMING SOON! WATCH THIS SPACE FOR PART 2!
IN THE MEANTIME – ENJOY WHAT YOU HAVE LEARNED AND DO TRY TO PUT IT TO PAPER SOON.
YOU WILL NEVER REGRET A MOMENT SPENt PAINTING!
HAPPY CHRISTMAS EVERYONE!
PART TWO
In my second SusanArt Studios Blog Post I will give you many examples of how a strategically-placed red can be the master-stroke in a painting composition.
WHAT BETTER GIFT THAN THE GIFT OF ART for artists or artist frends!
IT’S NOT TOO LATE – YOU STILL HAVE TIME TO PURCHASE A VIDEO DOWNLOAD – WHICH IS ALMOST INSTANT DELIVERY!
You can see these principles and everything else I know about watercolor painting in my Video Downloads and DVDs.
Each title has a free video preview allowing you to see some of the invaluable lessons within each of the titles.
- For all skill levels from beginners to advanced
- EVERY title has more than 3 hours teaching of invaluable light-bulb lessons you won’t want to miss
- Easy to grasp logic that will help you fast-track your learning – allowing you avoid so many of the traps for young players
Click here for free preview video and in-depth information on contents:
